I recently came across a question on the digital forensics subreddit that was asking if it’s possible to extract the EXIF data from an image that was attached to an email. This question piqued my interest because it was something I had moderate familiarity with - accessing an inbox programmatically with Python and analyzing the individual emails - and it seemed like a good place to boost my digital forensics skills. My hypothesis was that the reason OP was seeing incorrect timestamps (the crux of the issue they described in their question) was because they were downloading the image, and thus creating a new file with new timestamps, and what they actually wanted to do was read the raw data of the attached image as that would hold the correct information. So I set out to prove or disprove that hypothesis.
Reproducing the scenario
The first step I took in this experiment was to reproduce the issue. I wanted to confirm that I had the same experience as OP when trying to interact with attached images. To do this, I started by ensuring I had photos that had EXIF data by cloning Ianaré Sévi’s exif-samples repo. I could have just downloaded an image, but this seemed more straightforward. Now that I had a set of images I could use, I needed to send myself an email with an image attached so that I could go through the process of downloading it from the email server and then checking the exif data. There were two images that I used in my testing: Konica_Minolta_DiMAGE_Z3.jpg and Nikon_COOLPIX_P1.jpg. The former was used while writing the code, and the second was used as a test once the code was actually written.
So now that I had a repository of images, I set out to reproduce the issue. I used GMail as that’s my primary email provider and sent the Konica Minolta image to myself, both as an attachment and as an inline image. In order to send the image as an inline image, I simply right-clicked on the file in File Explorer, clicked “Copy” from the menu, and then pasted that data into the body of the email.
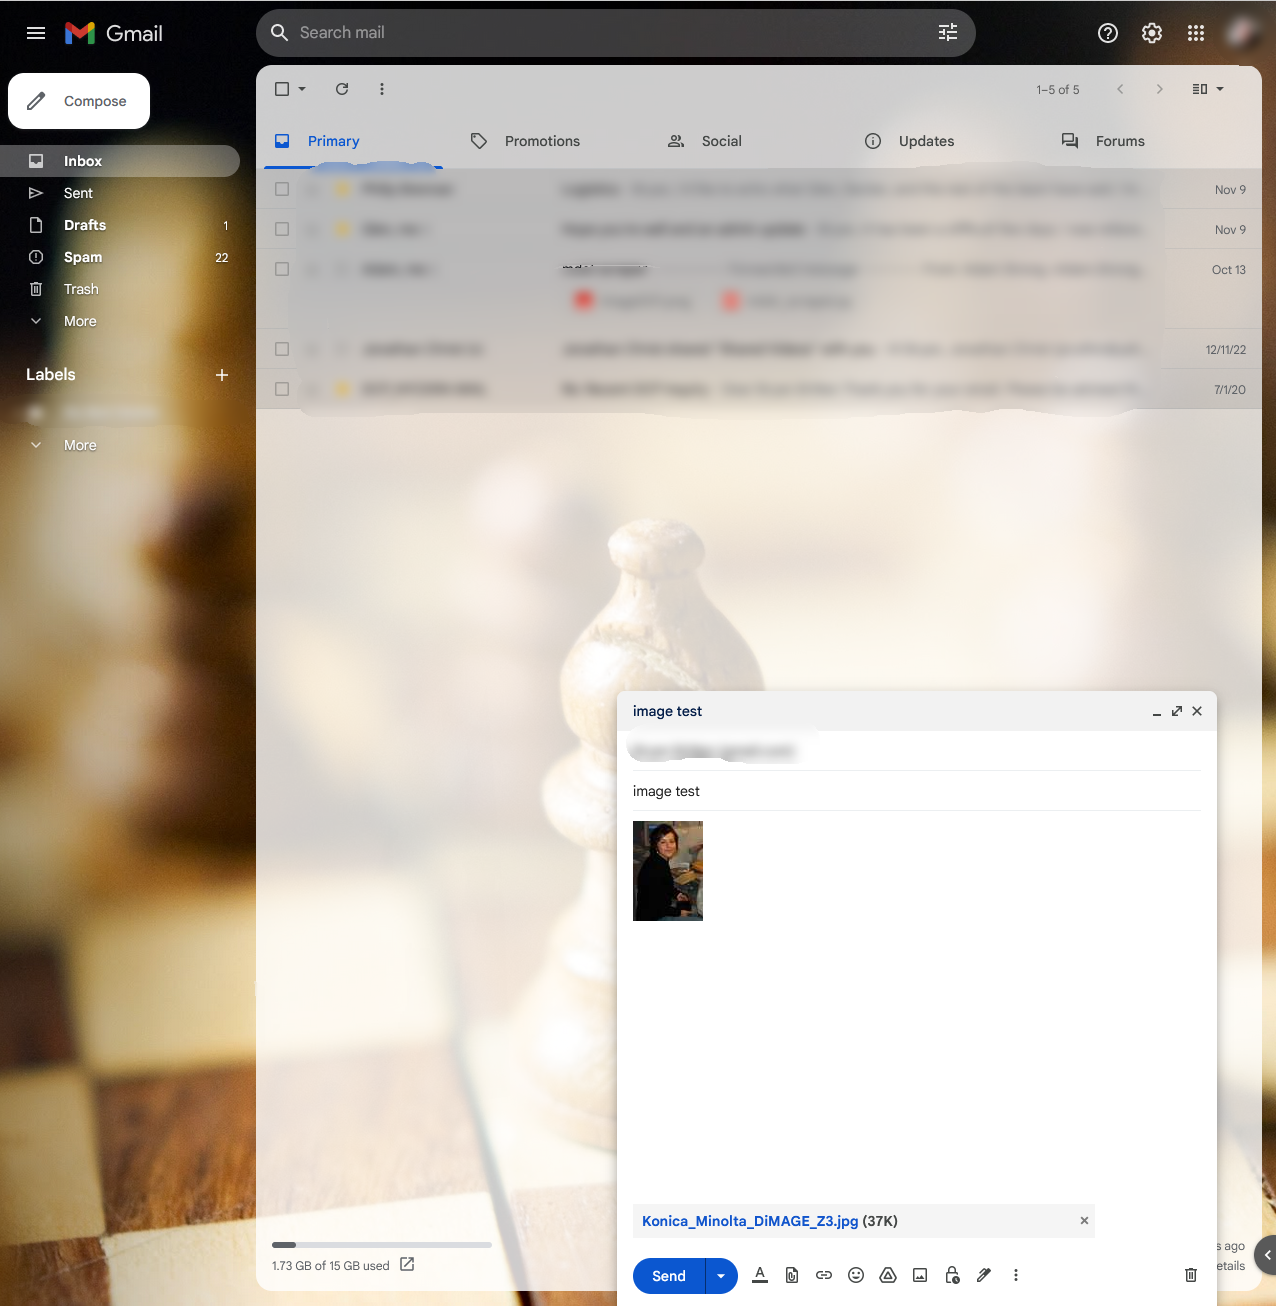
I then sent the email to myself, downloaded both images and saved them as attached.jpg and embedded.jpg, and then uploaded them to https://exif.tools to inspect their timestamps. There was too much data for the attached.jpg file to fit it all into a single screenshot, but a subset of the results for both the attached and inline photos can be seen below.
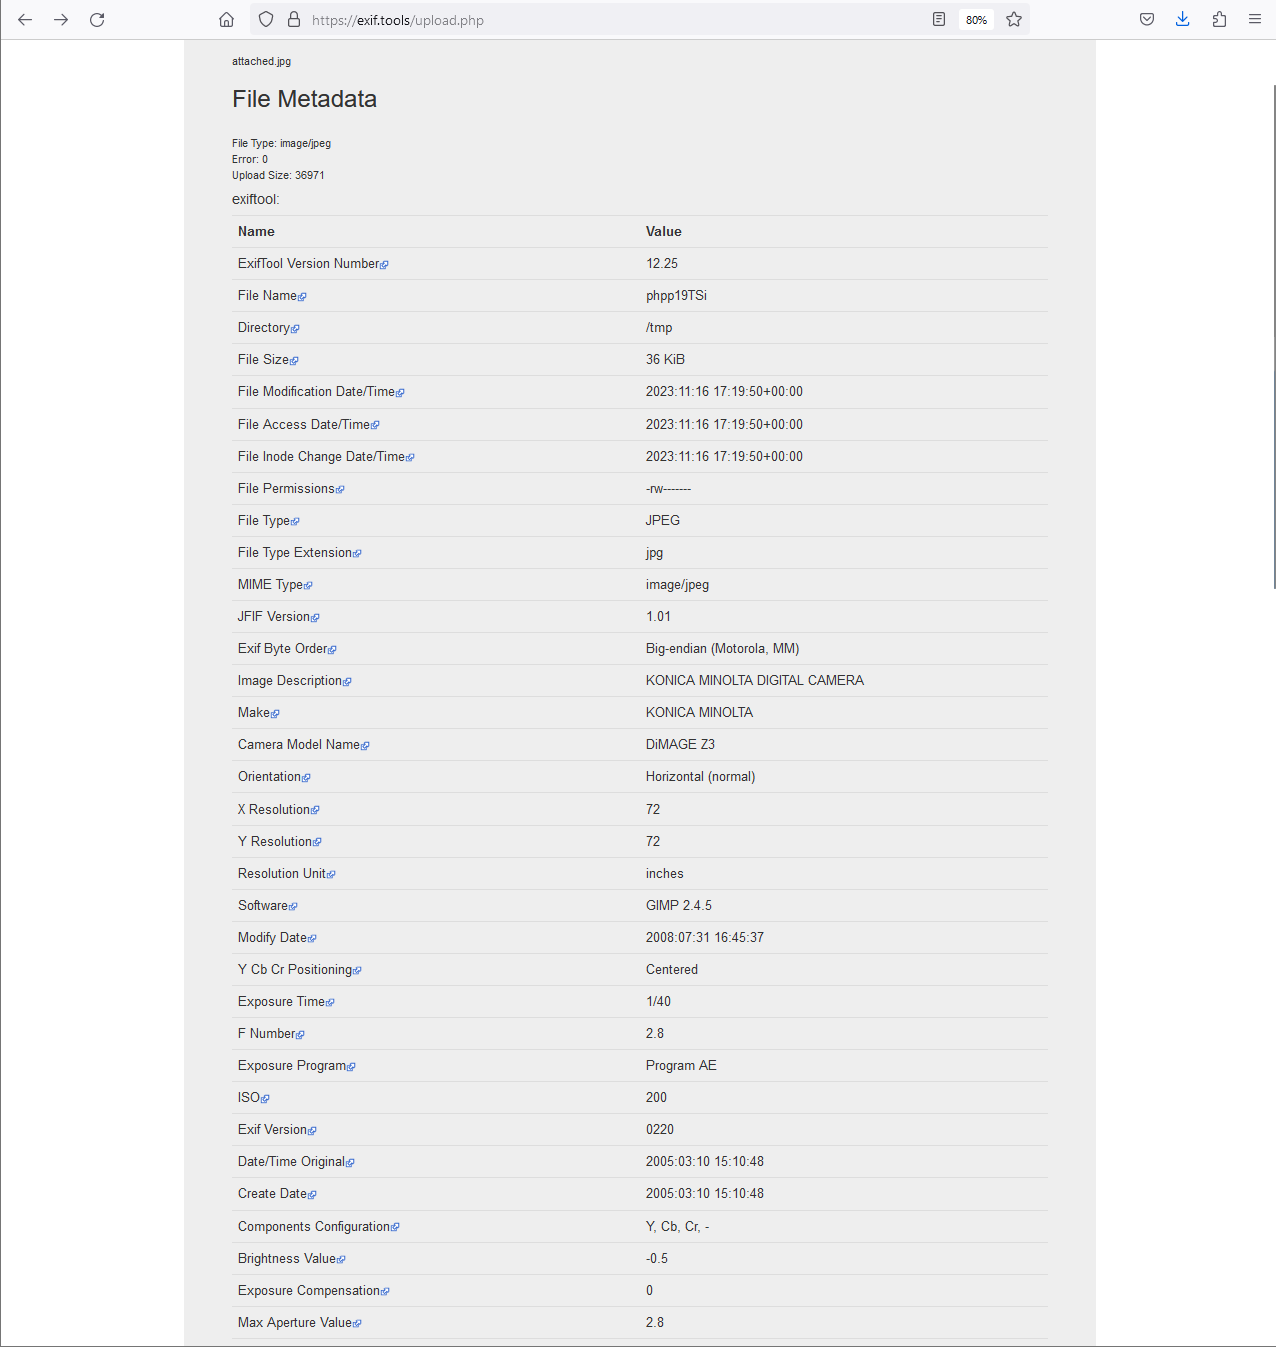
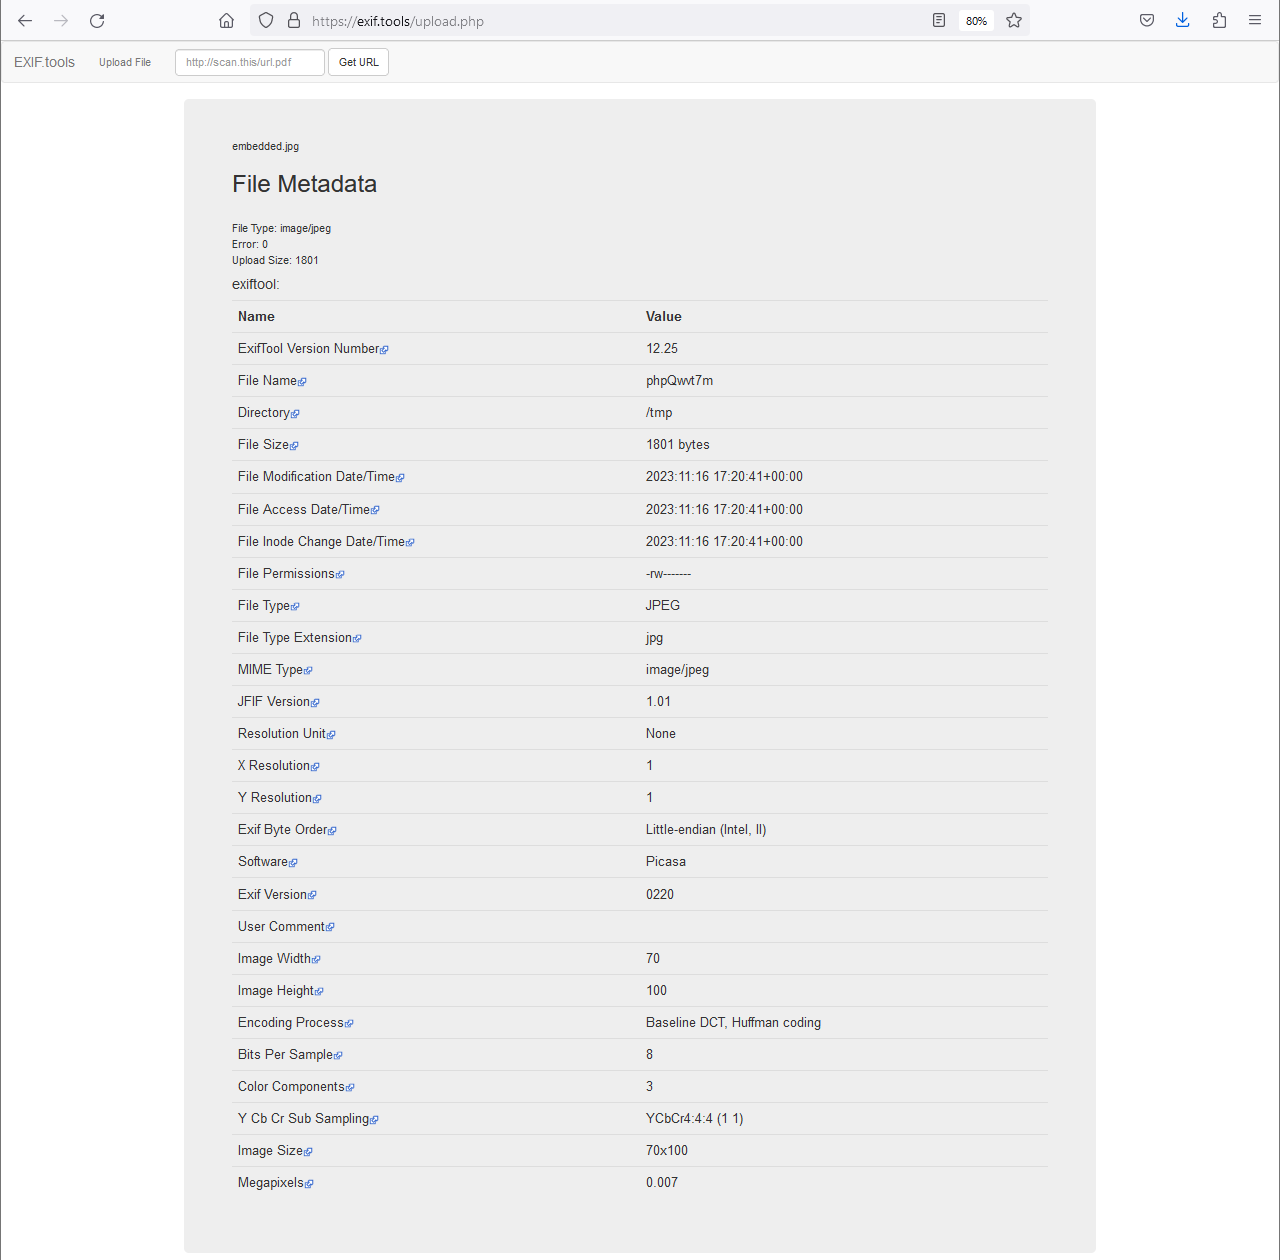
At this point, I realized that OP may have just been looking at the wrong information in whatever EXIF tool they were using. Their post noted that the image file was an attachment, and that they had used a couple of EXIF tools, but the dates were all associated with then OP had downloaded the file. Given that my local testing showed that, at least in GMail, the EXIF data persisted on the file even after being sent to Google’s mail server and then to my email client, and that at least one tool was able to extract it. But my curiosity remained. What if the EXIF data didn’t persist with other email providers? What if OP was mistaken and they thought an inline image and an attached image were the same thing? Is it even possible to grab the EXIF data without downloading the file? Why didn’t the inline photo have any EXIF data returned from the online tool? To answer these questions, I wanted to write my own script to extract the EXIF data.
Getting things ready
Before I started writing any code, there were a couple of things I needed to do to ensure I could even access my inbox. The first was to set up API access to GMail. This wasn’t something I had done before, but thankfully we live in a time where ChatGPT can do a lot of the heavy lifting for us. Here are the steps that ChatGPT provided for setting this up.
- Create a Project in Google Cloud Console:
- Visit the Google Cloud Console.
- Click on “Select a project” and then “NEW PROJECT”.
- Give your project a name, and click “CREATE”.
- Enable Gmail API for Your Project:
- In the dashboard of your new project, navigate to the “APIs & Services > Dashboard”.
- Click on “+ ENABLE APIS AND SERVICES”.
- Search for “Gmail API” and select it.
- Click on “ENABLE”.
- Create Credentials for Gmail API:
- After enabling the Gmail API, go to the “Credentials” tab.
- Click on “Create Credentials” at the top of the page.
- Choose “OAuth client ID”.
- If prompted, configure the OAuth consent screen by selecting the user type (usually “External”) and entering the required information.
- Once the consent screen is configured, return to the “Create Credentials” and choose “OAuth client ID” again.
- Select “Desktop app” as the Application type.
- Name your OAuth 2.0 client and click “Create”.
- Download the Credentials JSON File:
- After creating the OAuth client ID, click on the download button (looks like a download icon) to the right of the client ID in the Credentials tab.
- This will download a JSON file containing your client credentials. Save this file; you’ll need it to authenticate your Python script with Gmail.
Lastly, I needed to install a few packages in Python.
pip install --upgrade google-api-python-client google-auth-httplib2 google-auth-oauthlib pillow
The first three packages, as I’m sure you can tell, are for interacting with Google’s API, both for authentication and for accessing the inbox. The last package, pillow, is the Python Image Library (PIL) package, and is what I used for extracting the EXIF data. Once you complete these five steps, you’re ready to start accessing your inbox!
Getting the test email
The next step is to actually get the email that I sent myself with the images attached. Let’s take it step by step so that I can ensure the code makes sense. I’ll start with just the boilerplate setup stuff.
#!/usr/bin/python

from google.oauth2.credentials import Credentials
from google_auth_oauthlib.flow import InstalledAppFlow
from googleapiclient.discovery import build
from google.auth.transport.requests import Request
from PIL import ExifTags, Image
import base64
import io
import os

if __name__ == '__main__':
    print("Hello, world!")
If you’re not familiar with Python, the if __name__ == '__main__' line is Python’s way of defining the entrypoint for a script. It basically says “if this file is being run directly, instead of imported by another module, run these commands”. With the biolerplate imports and entrypoint all set up, we can define our first function, which sets up the Google service, which is then used in all of our subsequent functions.
AUTH_DIR = "./creds"
SCOPES = ['https://www.googleapis.com/auth/gmail.readonly']

def get_gmail_service():
    creds = None
    if os.path.exists(f'{AUTH_DIR}/token.json'):
        creds = Credentials.from_authorized_user_file(f'{AUTH_DIR}/token.json', SCOPES)
    # If there are no (valid) credentials available, let the user log in.
    if not creds or not creds.valid:
        if creds and creds.expired and creds.refresh_token:
            creds.refresh(Request())
        else:
            flow = InstalledAppFlow.from_client_secrets_file(
                f'{AUTH_DIR}/google-credentials.json', SCOPES)
            creds = flow.run_local_server(port=0)
        # Save the credentials for the next run
        with open(f'{AUTH_DIR}/token.json', 'w') as token:
            token.write(creds.to_json())

    service = build('gmail', 'v1', credentials=creds)
    return service
While the AUTH_DIR variable wasn’t stricly necessary, it’s helpful to keep it at the top of the file so that it only has to be changed in one place if I ever decide to save the auth files anywhere else. The SCOPES variable is required as it defines the scope(s) under which we want our service to operate. The function itself, get_gmail_service, merely runs through a series of steps to authenticate the user. It first looks for a token.json file in the AUTH_DIR directory, which it won’t find. This file is created after the first time we authenticate. As a result, the next if statement that checks if creds is missing or if they’re invalid will evaluate to True and we step into that piece of the code. The third if statement, which checks if the creds are expired, will result to False because creds is None. So the else block executes, creds is defined using the google-credentials.json file in my AUTH_DIR directory (note that I changed the name of the file that I downloaded from Google to be more human-readable), and service is built and returned. Also note that this block of code creates the new token.json file after successfully authenticating, so the next time we run this code, that first if statement will evaluate to True and the token.json file will be used to establish creds.
Now that we have our service, we need to use it to grab all of the emails from our inbox.
def get_messages(service, user_id='me', folders=['INBOX']):
    if not isinstance(folders, list):
        folders = [folders]
    results = service.users().messages().list(userId=user_id, labelIds=folders).execute()
    return results.get('messages', [])
A value of 'me' is used as the user_id, which I assume is rather self-explanatory. The folders parameter can take in an array of strings, where each string refers to the name of a folder in your mail client (e.g. “SENT”, “TRASH”, etc). We’re only interested in the inbox. We do a quick check to ensure that the folders parameter is a list and not a single string, and then we get all of the emails from the specified list of folders. But we don’t want to analyze all of the emails. Just the one that has the images. So we need to filter the emails.
Filtering the emails
We’ll add two new functions that allow us to filter our emails.
def compare(headers, key, query_str):
    value = next(header['value'] for header in headers if header['name'] == key)
    if not value:
        return False
    return value.lower().strip() == query_str.lower().strip()

def filter_messages(service, messages, filters={}, user_id='me'):
    filtered_messages = []
    try:
        for message in messages:
            msg = service.users().messages().get(userId=user_id, id=message['id'], format='full').execute()
            headers = msg['payload']['headers']

            for key, value in filters.items():
                if compare(headers, key, value):
                    filtered_messages.append(msg)
                    continue

        return filtered_messages
    except Exception:
        raise ValueError("Something has gone wrong!") from None
The compare function likely won’t make too much sense right now, but will in just a moment. Its purpose is to take in the headers object from the email, which you can see if obtained in the filter_messages function. It then takes in two other parameters: key and query_str. The key parameter is used to specify which value from headers should be extracted, and the query_str parameter specifies the value that the extracted header should match. The compare function then returns a True or False depending on if the standardized values match.
The filter_messages function takes in four parameters. The first is the service variable that we defined above, and the second is all of the messages that were returned from our get_messages function. The third parameter is how we can specify which email(s) we want returned out of all of the emails. We’ll look into how we specify this in just a second. The last parameter is the same user_id parameter that we saw above. The function itself loops through all of the messages, and for each one gets their headers and then determines if the headers contain the information we’re looking for as specified in the filters object. To really understand this, let’s synthesize everything we have so far and define an example filter.
#!/usr/bin/python

from google.oauth2.credentials import Credentials
from google_auth_oauthlib.flow import InstalledAppFlow
from googleapiclient.discovery import build
from google.auth.transport.requests import Request
from PIL import ExifTags, Image

AUTH_DIR = "./creds"
SCOPES = ['https://www.googleapis.com/auth/gmail.readonly']

def get_gmail_service():
    creds = None
    if os.path.exists(f'{AUTH_DIR}/token.json'):
        creds = Credentials.from_authorized_user_file(f'{AUTH_DIR}/token.json', SCOPES)
    # If there are no (valid) credentials available, let the user log in.
    if not creds or not creds.valid:
        if creds and creds.expired and creds.refresh_token:
            creds.refresh(Request())
        else:
            flow = InstalledAppFlow.from_client_secrets_file(
                f'{AUTH_DIR}/google-credentials.json', SCOPES)
            creds = flow.run_local_server(port=0)
        # Save the credentials for the next run
        with open(f'{AUTH_DIR}/token.json', 'w') as token:
            token.write(creds.to_json())

    service = build('gmail', 'v1', credentials=creds)
    return service

def get_messages(service, user_id='me', folders=['INBOX']):
    if not isinstance(folders, list):
        folders = [folders]
    results = service.users().messages().list(userId=user_id, labelIds=folders).execute()
    return results.get('messages', [])

def compare(headers, key, query_str):
    value = next(header['value'] for header in headers if header['name'] == key)
    if not value:
        return False
    return value.lower().strip() == query_str.lower().strip()

def filter_messages(service, messages, filters={}, user_id='me'):
    filtered_messages = []
    try:
        for message in messages:
            msg = service.users().messages().get(userId=user_id, id=message['id'], format='full').execute()
            headers = msg['payload']['headers']

            for key, value in filters.items():
                if compare(headers, key, value):
                    filtered_messages.append(msg)
                    continue

        return filtered_messages
    except Exception:
        raise ValueError("Something has gone wrong!") from None

if __name__ == '__main__':
    service = get_gmail_service()
    emails = get_messages(service)
    filters= {
        "Subject": "Image Test",
    }
    filtered_emails = filter_messages(service, emails, filters)
So, now when we call our script with python gmail_inbox_reader.py (or whatever you name your file), it will start at the if __name__ == '__main__' line, which will evaluate to True because we’re calling the script directly, and it’ll run each line of code sequentially. It will first establish a service, and then pass that service into get_messages, which will return all of the messages in my inbox. You could add something like print(len(emails)) above the filters = {...} line as a sanity check to ensure it’s working properly at this point. Now that it has all of the emails from my inbox, it defines a filters variable, which is a dictionary containing a single key-value pair. Our service, all of the emails from our inbox, and this filters variable are all passed into filter_messages. So let’s go back to that code to see what happens.
Assuming we have at least one email in our inbox, filter_messages starts with that first email and makes a call to get the whole email. Initially, all we have is, effectively, a pointer object that tells what email it’s referencing, but the message object does not contain the actual email. Getting the whole email is what the line msg = service.users().messages().get(...).execute() is doing. You’ll notice that we pass format='full', which is how we tell Google to give us all of the data for the email, as opposed to, say, just the metadata. We then extract the headers and move to the for loop. Because filters contains a single key-value pair, this for loop will make one iteration, but if we had more data in filters - maybe you want to return all emails with a specific subject OR from a specific sender - then it would loop through each of those key-value pairs. In this scenario, it sets key to “Subject” and value to “Image Test”. It then passes in headers, key, and value into compare. The compare function takes advantage of Python functionality to do this in a single line, so let’s break that down. The first step is the tuple comprehension.
header['value'] for header in headers if header['name'] == key
This could be rewritten as follows:
values = []
for header in headers:
    if header['name'] == key:
        values.append(header)
Once it has the set of values, it calls next, which is a function in Python that takes in an iterator and returns the first non-null value. In this scenario, it’s effectively the same as calling values[0], but in a somewhat cleaner way since we can do it all on one line and not worry about an “index out of bounds” error if no data is returned. If no corresponding header is found, we simply return False, otherwise we compare the header value to the value we’re looking for and return a boolean indicating if they’re the same.
Now, going back to the filter_messages function, we can see that we’re looping through each key-value pair in filters and using the key to extract the relevant header data and then comparing the header value to the value that was defined in filters. If it’s a match, we append the full message (msg not message) to filtered_messages. Once we’ve looped through all of the messages this way, we return any emails that matched our criteria.
Extracting the EXIF data
This is the final step of the process, and to achieve this we’ll need two more functions.
def extract_exif_fields_of_interest(exif_data):
    labeled_exif = {ExifTags.TAGS[k]: v for k, v in exif_data.items() if k in ExifTags.TAGS}
    return {
        "Make": labeled_exif.get('Make', ''),
        "Model": labeled_exif.get("Model", ''),
        "Software": labeled_exif.get("Software", ''),
        "DateTime": labeled_exif.get("DateTime", ''),
        "DateTimeOriginal": labeled_exif.get("DateTimeOriginal", ''),
        "DateTimeDigitized": labeled_exif.get("DateTimeDigitized", ''),
    }

def extract_exif_from_images(service, message, user_id='me'):
    msg_id = message['id']

    for part in message['payload'].get('parts', []):
        if 'filename' in part and part['filename']:
            file_data = None
            if 'data' in part['body']:
                file_data = part['body']['data']
            else:
                attachment_id = part['body'].get('attachmentId')
                attachment = service.users().messages().attachments().get(
                    userId=user_id, messageId=msg_id, id=attachment_id).execute()
                file_data = attachment['data']

            if file_data:
                file_data = base64.urlsafe_b64decode(file_data)
                image = Image.open(io.BytesIO(file_data))

                exif_data = image._getexif()
                if exif_data:
                    print(extract_exif_fields_of_interest(exif_data))
                else:
                    print(f"No EXIF data found for inline image in message {msg_id}")
The first function I’ll focus on is the extract_exif_fields_of_interest function. This is a helper function that defines the set of fields we want, and also does the job of labeling the keys in the EXIF data. By default, the Image class from the PIL library uses the numerical IDs of the EXIF data fields as the keys in the returned dictionary. I understand why they’d do this, but it’s not the most usable for us, so this function also converts those numerical IDs into their human-readable equivalent. That’s what labeled_exif = {ExifTags.TAGS[k]: v for k, v in exif_data.items() if k in ExifTags.TAGS} does.
The other function of interest is extract_exif_from_images. I used ChatGPT to help me generate this code as well, but it’s fairly straightforward. It takes in a single message, as well as the service object and a user_id, and loops over the parts field in the message['payload'] object. This is what the parts object looks like for the Konica Minolta image.
>>> message['payload'].get('parts', [])
[{'partId': '0', 'mimeType': 'multipart/related', 'filename': '', 'headers': [{'name': 'Content-Type', 'value': 'multipart/related; boundary="000000000000db45e9060a483500"'}], 'body': {'size': 0}, 'parts': [{'partId': '0.0', 'mimeType': 'multipart/alternative', 'filename': '', 'headers': [{'name': 'Content-Type', 'value': 'multipart/alternative; boundary="000000000000db45e8060a4835ff"'}], 'body': {'size': 0}, 'parts': [{'partId': '0.0.0', 'mimeType': 'text/plain', 'filename': '', 'headers': [{'name': 'Content-Type', 'value': 'text/plain; charset="UTF-8"'}], 'body': {'size': 39, 'data': 'W2ltYWdlOiBLb25pY2FfTWlub2x0YV9EaU1BR0VfWjMuanBnXQ0K'}}, {'partId': '0.0.1', 'mimeType': 'text/html', 'filename': '', 'headers': [{'name': 'Content-Type', 'value': 'text/html; charset="UTF-8"'}], 'body': {'size': 118, 'data': 'PGRpdiBkaXI9Imx0ciI-PGltZyBzcmM9ImNpZDppaV9scDFmZmI1ZDEiIGFsdD0iS29uaWNhX01pbm9sdGFfRGlNQUdFX1ozLmpwZyIgd2lkdGg9IjcwIiBoZWlnaHQ9IjEwMCI-PGJyPjxicj48L2Rpdj4NCg=='}}]}, {'partId': '0.1', 'mimeType': 'image/jpeg', 'filename': 'Konica_Minolta_DiMAGE_Z3.jpg', 'headers': [{'name': 'Content-Type', 'value': 'image/jpeg; name="Konica_Minolta_DiMAGE_Z3.jpg"'}, {'name': 'Content-Disposition', 'value': 'attachment; filename="Konica_Minolta_DiMAGE_Z3.jpg"'}, {'name': 'Content-Transfer-Encoding', 'value': 'base64'}, {'name': 'X-Attachment-Id', 'value': 'ii_lp1ffb5d1'}, {'name': 'Content-ID', 'value': '<ii_lp1ffb5d1>'}], 'body': {'attachmentId': 'ANGjdJ8qhsJ3z_hfM1iMdIUdcJOHRLfDOfR7w2aRkeHpqDU5wfwBL9xrhbr_j8ldFzOeFOD8Yk60b0q4t48FnbHHvjmQcQ_AWB9_ogLYp3H-8OoxAbYv_HwSeYrzWI_jn-VDjZlLOilEPthyOxk22AdwtpDx4dukenHBuGd_2nCDxsq1HxDUTHvXAfv7OE5Gws4thWOnvHpJIvX_S4SOEsyZOojXyw_cHJ2fyRMXE4-SykVEzoYM4zNwxdvU3ahpdSwyHdJWQw7CjzB0JLOam8eW25umMdk-LM1wuwa7JToY3HrOE_aMPFuDTkOhu08', 'size': 36971}}]}, {'partId': '1', 'mimeType': 'image/jpeg', 'filename': 'Konica_Minolta_DiMAGE_Z3.jpg', 'headers': [{'name': 'Content-Type', 'value': 'image/jpeg; name="Konica_Minolta_DiMAGE_Z3.jpg"'}, {'name': 'Content-Disposition', 'value': 'attachment; filename="Konica_Minolta_DiMAGE_Z3.jpg"'}, {'name': 'Content-Transfer-Encoding', 'value': 'base64'}, {'name': 'X-Attachment-Id', 'value': 'f_lp1ff3tk0'}, {'name': 'Content-ID', 'value': '<f_lp1ff3tk0>'}], 'body': {'attachmentId': 'ANGjdJ8Uz6BR3BM1cBhBzcmoG5yC5jhhuBQpctFtHvhVOTHbi8IDYyX4ONRROWG8o-41UwKCLU_ZadU3D2NkM0K_zUcWiJlvq0_CCxsL_wG-ptHKTe_GNKs-Fqpu-DgRnUX4jy1gVAa8-oIwBI_9VluwqrkUkigJ946tBDHjpAxMZWXZErp7bGsIDHlV9pOxlsIoKFcevZLSzOu_0U4-tuwXJm-rxPDMwq9iQAMz8vl-1kGQ83FiiTA99h6skuout61MauzZNJYW0Uv3Tuvgw1Ve1QIIQi30Ea2tE9XTsJjOStpAsJGYh-Xn3P9f9oA', 'size': 36971}}]
Using the data that is embedded in the parts object, the file_data variable is populated, and is then passed to base64.urlsafe_b64decode before being passed to Image.open(io.BytesIO()). Lastly, we take the data returned from Image.open and pass it into the final line: exif_data = image._getexif(), where image is the variable that was returned from Image.open. We’re now ready to return the EXIF data from the inline image. Let’s put all of the code together one last time and run it in its entirety.
#!/usr/bin/python

from google.oauth2.credentials import Credentials
from google_auth_oauthlib.flow import InstalledAppFlow
from googleapiclient.discovery import build
from google.auth.transport.requests import Request
from PIL import ExifTags, Image
import io
import os
import base64

AUTH_DIR = "./creds"
SCOPES = ['https://www.googleapis.com/auth/gmail.readonly']

def get_gmail_service():
    creds = None
    if os.path.exists(f'{AUTH_DIR}/token.json'):
        creds = Credentials.from_authorized_user_file(f'{AUTH_DIR}/token.json', SCOPES)
    # If there are no (valid) credentials available, let the user log in.
    if not creds or not creds.valid:
        if creds and creds.expired and creds.refresh_token:
            creds.refresh(Request())
        else:
            flow = InstalledAppFlow.from_client_secrets_file(
                f'{AUTH_DIR}/google-credentials.json', SCOPES)
            creds = flow.run_local_server(port=0)
        # Save the credentials for the next run
        with open(f'{AUTH_DIR}/token.json', 'w') as token:
            token.write(creds.to_json())

    service = build('gmail', 'v1', credentials=creds)
    return service

def get_messages(service, user_id='me', folders=['INBOX']):
    if not isinstance(folders, list):
        folders = [folders]
    results = service.users().messages().list(userId=user_id, labelIds=folders).execute()
    return results.get('messages', [])

def compare(headers, key, query_str):
    value = next(header['value'] for header in headers if header['name'] == key)
    if not value:
        return False
    return value.lower().strip() == query_str.lower().strip()

def filter_messages(service, messages, filters={}, user_id='me'):
    filtered_messages = []
    try:
        for message in messages:
            msg = service.users().messages().get(userId=user_id, id=message['id'], format='full').execute()
            headers = msg['payload']['headers']

            for key, value in filters.items():
                if compare(headers, key, value):
                    filtered_messages.append(msg)
                    continue

        return filtered_messages
    except Exception:
        raise ValueError("Something has gone wrong!") from None

def extract_exif_fields_of_interest(exif_data):
    labeled_exif = {ExifTags.TAGS[k]: v for k, v in exif_data.items() if k in ExifTags.TAGS}
    return {
        "Make": labeled_exif.get('Make', ''),
        "Model": labeled_exif.get("Model", ''),
        "Software": labeled_exif.get("Software", ''),
        "DateTime": labeled_exif.get("DateTime", ''),
        "DateTimeOriginal": labeled_exif.get("DateTimeOriginal", ''),
        "DateTimeDigitized": labeled_exif.get("DateTimeDigitized", ''),
    }

def extract_exif_from_images(service, message, user_id='me'):
    msg_id = message['id']

    for part in message['payload'].get('parts', []):
        if 'filename' in part and part['filename']:
            file_data = None
            if 'data' in part['body']:
                file_data = part['body']['data']
            else:
                attachment_id = part['body'].get('attachmentId')
                attachment = service.users().messages().attachments().get(
                    userId=user_id, messageId=msg_id, id=attachment_id).execute()
                file_data = attachment['data']

            if file_data:
                file_data = base64.urlsafe_b64decode(file_data)
                image = Image.open(io.BytesIO(file_data))

                exif_data = image._getexif()
                if exif_data:
                    print(extract_exif_fields_of_interest(exif_data))
                else:
                    print(f"No EXIF data found for inline image in message {msg_id}")


if __name__ == '__main__':
    service = get_gmail_service()
    emails = get_messages(service)
    filters= {
        "Subject": "Image Test",
    }
    filtered_emails = filter_messages(service, emails, filters)
    print(f"Found {len(filtered_emails)} email(s).")
    for email in filtered_emails:
        embedded_exif = extract_exif_from_images(service, email)
And here are the results from running it.
$ python gmail_inbox_reader.py
Found 1 email(s).
{'Make': 'KONICA MINOLTA ', 'Model': 'DiMAGE Z3', 'Software': 'GIMP 2.4.5', 'DateTime': '2008:07:31 16:45:37', 'DateTimeOriginal': '2005:03:10 15:10:48', 'DateTimeDigitized': '2005:03:10 15:10:48'}
And just like that, we’re able to extract the EXIF data from an embedded image in a GMail email!
Proving the code works
At this point, you might be asking yourself the same question I was asking myself once I got this to run. How do I know that it’s returning the EXIF data from the inline image and not the image that was added as an attachment? To test this, I used a second image and a new email in which I did not attach the image and only pasted it inline. Here are the results of running the code with this new email and image.
$ python gmail_inbox_reader.py
Found 1 email(s).
{'Make': 'NIKON', 'Model': 'COOLPIX P1', 'Software': 'GIMP 2.4.5', 'DateTime': '2008:07:31 17:43:03', 'DateTimeOriginal': '2008:03:07 09:55:46', 'DateTimeDigitized': '2008:03:07 09:55:46'}
I leave it as an exercise to the reader to confirm that the data is correct and matches the EXIF on the file.