In a recent series of posts I’ve been writing, I started looking into a hypothetical web server breach as part of a CTF challenge to help bolster my DFIR skills. The web server that has been breached is a Windows 2008 web server running the Damn Vulnerable Web App(DVWA) via the XAMPP stack, and I thought it would be a good idea to spin up my own version of this web server so that I could try to replicate the attacks I was finding in the logs to better understand them. “This shouldn’t be that hard of a task”, I said to myself naively, “I’ll just grab an ISO file and spin this up in VirtualBox”. The words “this shouldn’t be too hard” will certainly be my epitaph when I pass. This endeavor proved to be rather tedious, and involved quite a bit of troubleshooting, which I figured might be worth documenting in one place. Who knows, maybe someone in the future will find themselves in a similar position - wanting to spin up a Windows Server 2008 web server running XAMPP - and this blog post will help them do so rather seamlessly. So, without further ado, I present to you the litany of issues I had and how I went about troubleshooting and solving them.
Problem #1 - Finding a working ISO file
The first issue I had when trying to set up this server was finding an ISO that would work. I started with a simple Google search for “Windows Server 2008 ISO”, which led to a couple of promising options from Microsoft itself, including this one, which offered Windows Server 2008 R2 Service Pack 1; this one, which offered a DVD ISO file for Windows Server 2008 SP 2; and this one, which offered a Windows Server 2008 VHD. The VHD wasn’t really an option given that the install instructions on the download page state that you need Hyper-V, and I’m using VirtualBox instead. I assumed that I could still make this work with VirtualBox since it’s just a virtual hard drive file and Microsoft is of course going to peddle their own hypervisor, but the download files came in three parts, which included an .exe file and two .rar files. I wasn’t sure how to combine that into a single .vhd file that I could point my new VM at, so I marked this route as a non-option. The other two options simply stated that no bootable media was found when trying to spin up a VM. Even following the instructions found in this post, which specifies the need to have PAE/NX and VT-x/AMD-V (options listed under the Processor tab in the System menu in VirtualBox) turned on didn’t work. I tried several other tweaks as well to try to get these files to work, but to no avail. This was obviously frustrating because without a working ISO file, I’d have no chance of spinning up this server, and the internet was not doing me any favors when it came to trying to debug why this wasn’t even reading the ISO file as a bootable media. The internet, however, did come to my aid in the form of a lone YouTube video that provided a link to a Windows 2008 R2 ISO hosted on mega.nz. Thankfully, for whatever reason, this ISO worked, and I was finally up and running. Also, for what it’s worth, Windows Server 2008 comes with a few “versions” that you can install. I found this site to provide pretty concrete explanations of what each “version” entailed, and I opted to install the Web Server (Full) option as I didn’t want to be restricted to the command line for all of my operations. The only other choice you need to make during the installation process is whether to do a “Standard” or “Custom” install. Since this is a fresh VM and there are no files to preserve, I went with the “Custom” option and accepted the defaults for the rest of the installation wizard. Once the VM restarts to complete the installation process, you’ll need to create a new password for the Administrator account, which needs to adhere to these password complexity rules.
Side note: I’ve opted to host the ISO file on Dropbox as well so that others are able to grab it seamlessly in the future.
Problem #2 - Connecting to the Internet
Now that I was able to create the virtual machine and log in, it was time to start downloading the software that I needed. This, of course, would require that I had access to the internet. As a quick aside, it’s worth pointing out that I figured my desire to spin up the DVWA was a good opportunity to make my way through Tony Robinson’s book Building Virtual Machine Labs replacing the Metasploitable box with the DVWA. The reason this is worth bringing up is because that book walks you through how to segment your lab behind a pfsense gateway/router/firewall and how to set up your firewall rules such that the VMs can’t really communicate with each other unless explicitly allowed to. To see why this is important, let’s start with the issues I was having.
The first issue was that the server was able to connect to the network, but not to the internet. I was able to confirm that, from a networking perspective, everything seemed to be in order as the static IP address I had assigned to the MAC address assigned to this VM was in fact being assigned to this machine, which I was able to see with ipconfig. However, the network indicator in the system tray was telling me that I was not connected to the Internet. I thought it was weird that there was no Internet considering the other VMs I was running on the Host-Only network, the same network this VM was running on, were able to connect to the Internet. So I went through this whole process of switching the VM over to a Bridged network, which did seem to help, but only to the extent that the OS was now reporting that I was connected to the Internet. I’ve since gone back and switched the VM back over to the Host-Only network, as well as spun up other instances of this OS, and in both cases I have been unable to replicate the issue of being connected to the network, but not the Internet. My current hypothesis, based on some things I’ve learned since my initial attempts at getting this to work, is that the Standard (Full) “version” I installed the first time had some options set that restricted Internet access (Microsoft seems to go through a lot of effort to try to keep your server safe by turning off a lot of features that could increase your attack surface). I’m not sure of the details here, but it seems installing the Web Server makes it easier to establish an Internet connection.
Despite now being able to connect to the Internet, whenever I tried to go to a website, with the exception of google.com, I would get the same error: Internet Explorer cannot display this web page. Coming fresh off the back of troubleshooting my Internet connection, this error made me feel like I was still failing to actually connect to the Internet.
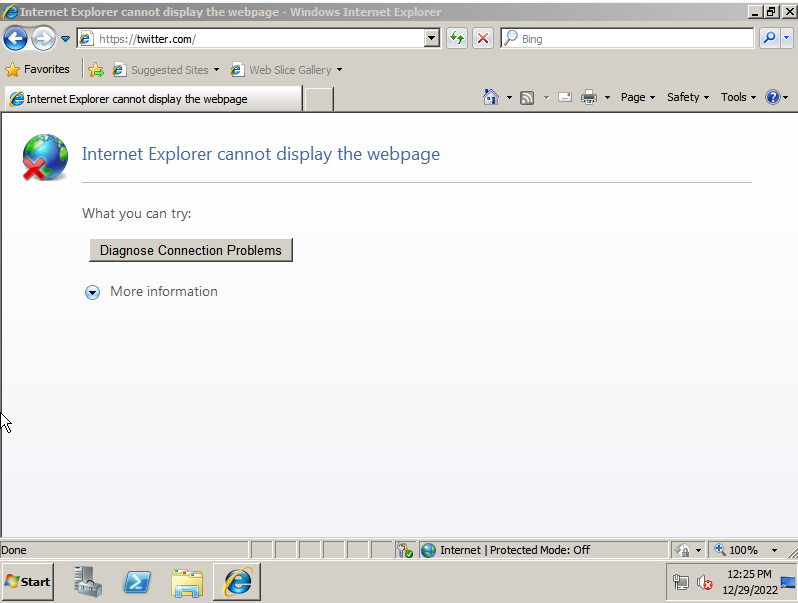
To make matters worse, the “Diagnose Connection Problems” and “More Information” buttons did nothing when clicked. I scoured the Internet looking for clues as to why this might be happening, and worked with a very helpful member of the Misec community to help me troubleshoot. As one is want to do with networking issues, we dug into analyzing DNS and routes trying to figure out what was going wrong. With nslookup, I was able to confirm that DNS was working because my machine was able to resolve domain names into IP addresses.
C:\UsersAdministrator>nslookup twitter.com
Server:  pfSense.home.arpa
Address: 172.16.1.

Non-authoritative answer:
Name:  twitter.com
Address: 104.244.42.129
I was also able to use tracert to confirm that I was unsuccessfully connecting to websites.
C:\Users\Administrator>tracert twitter.com

Tracing route to twitter.com [104.244.42.129]
over a maximum of 30 hops:

1    *    *    *    Request timed out.
2    *    *    *    Request timed out.
3    *    *    *    Request timed out.
4    *    *    *    Request timed out.
5    *    *    *    Request timed out.
6    *  ^C
After a bit of pondering, I remembered back to my days at the DA’s Office when I was working with Internet Explorer and sitting behind a proxy, and how I needed to specify that in the browser settings. Given how I have my home lab set up, all of my Internet traffic needed to be routed through the Squid proxy I was using with pfsense. Launching Internet Explorer, clicking Tools > Internet Options and then clicking on Connections > LAN Settings, I was able to set my proxy by checking the box labeled “Use a proxy server for your LAN” and filling in the address and port. I left the “Bypass proxy server for local addresses” checkbox unchecked. Surely now I’d be able to access websites or run tracert, right? Right?! Nope. No joy. What the heck?! More thinking ensued, and it dawned on me that there’s a very good reason for why tracert wasn’t working: it uses the ICMP protocol, which is blocked by my firewall. You can see the rules I have in place below.
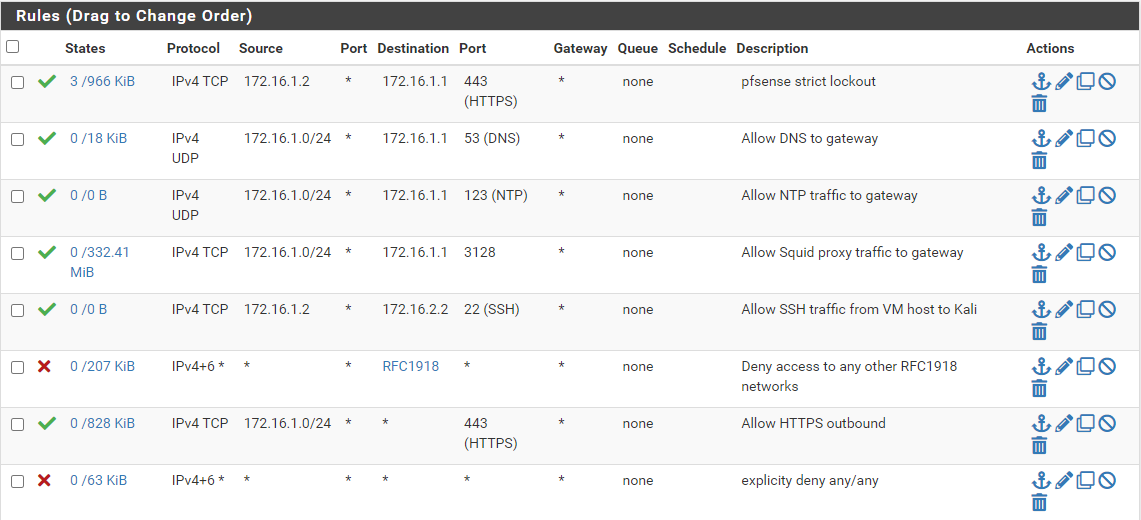
Thankfully, Tony did a really good job of explaining pfsense and how it approaches its firewall rules, and I remembered him saying that pfsense by default will block any traffic that is not explicitly allowed, which, as you can probably tell from my firewall rules, includes any and all ICMP traffic. Adding a rule that allows IPv4 ICMP from the 172.16.1.0/24 network resolves the issue and I’m able to use tracert to confirm that I am, in fact, albeit very slowly, able to connect to websites.
C:\Users\Administrator>tracert twitter.com

Tracing route to twitter.com [104.244.42.129]
over a maximum of 30 hops:

1    <1 ms    <1 ms    <1 ms pfSense.home.arpa [172.16.1.1]
2     1 ms     1 ms    <1 ms 192.168.1.254
3     2 ms     3 ms     2 ms 107.194.192.1
4     2 ms     2 ms     1 ms 64.148.96.60
5     *        *        *    Request timed out.
6     *        *        *    Request timed out.
7    21 ms    15 ms    15 ms 32.130.17.211
...
12   43 ms    43 ms    44 ms 104.244.42.129
So, I was clearly accessing the internet, and I was able to successfully establish connections with remote servers, so why was Internet Explorer not able to navigate to any websites? It took much longer than I care to admit to realize that I should look at the developer tools in the browser. Maybe that would shed some light on the situation.
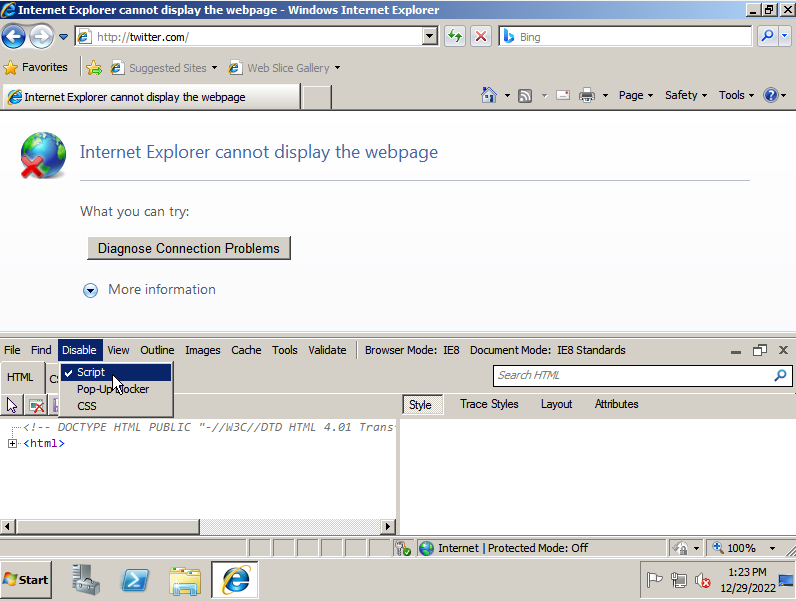
The first thing I noticed was a tab labeled “Disable”. Okay, that’s a lie. The first thing I noticed was just how different the developer tools looked in this old version of Internet Explorer (version 8.0). Anyway, when I clicked the “Disable” menu, I saw that “Scripts” had a checkmark next to it, indicating that scripts had been disabled. I clicked this menu item to enable scripts, and found that the “More information” button was now clickable and actually offered some sound advice. Notably, the last bullet point provided concrete steps to take to try to resolve the issue.
If this is an HTTPS (secure) address, click Tools, click Internet Options, click Advanced, and check to be sure the SSL and TLS protocols are enabled under the security section.
So, off I went to check if that was the issue, and I was pleasantly surprised to see that the checkboxes for SSL 2.0, TLS 1.1, and TLS 1.2 were unchecked.
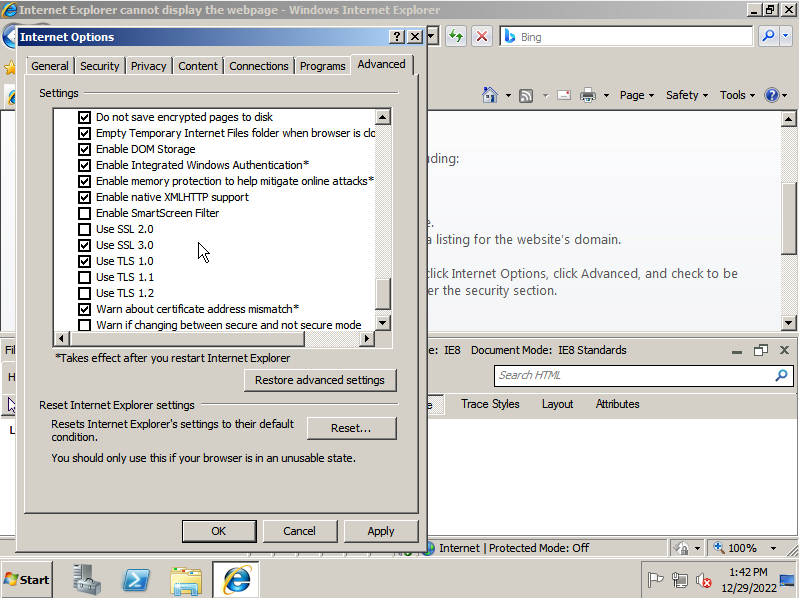
Enabling these options by checking the boxes and then reloading the webpage showed that my efforts were successful! I was still met with a page saying “This browser is no longer supported” when navigating to twitter.com, but that wasn’t important. I was just happy to finally be able to access the Internet. I could now finally do what I originally needed to do, which was download XAMPP and DWVA.
Problem #3 - Downloading the files
So now that I had Internet access, I headed over to Apache Friends, the official site to download XAMPP, and chose to download the oldest version that was available, which at the time of writing was 7.4.33. The reason I opted for the oldest version is that the CTF I’m doing is rather old, and thus likely used an older version of XAMPP on the server. Since I’m trying to replicate that web server as closely as possible, I wanted to use this older version of XAMPP. I was presented with a warning when I visited this page because, again, Microsoft tries its best to increase your server’s security and reduce risks and the website’s security certificate has expired. I clicked “continue to this website” and went about my day. If only that was the only issue with getting this installation executable. Clicking on the “Download” button next to the version you want redirects you to SourceForge, a site that will forever be ingrained in my memory as a site to ensure you download a virus. Nevertheless, I sat there, waiting for the “Your download will start shortly…” message in bright green text to become true. Alas, no luck. I tried changing the mirror from which the file was downloaded and still no luck. Finally I broke and navigated myself over to the Chrome download page, much to Internet Explorer’s chagrin. And to mine it would turn out. As I clicked the “Download Chrome” button, I was presented with yet another obstacle opportunity to learn more about what I was doing as I was informed that my “current security settings do not allow this file to be downloaded”.
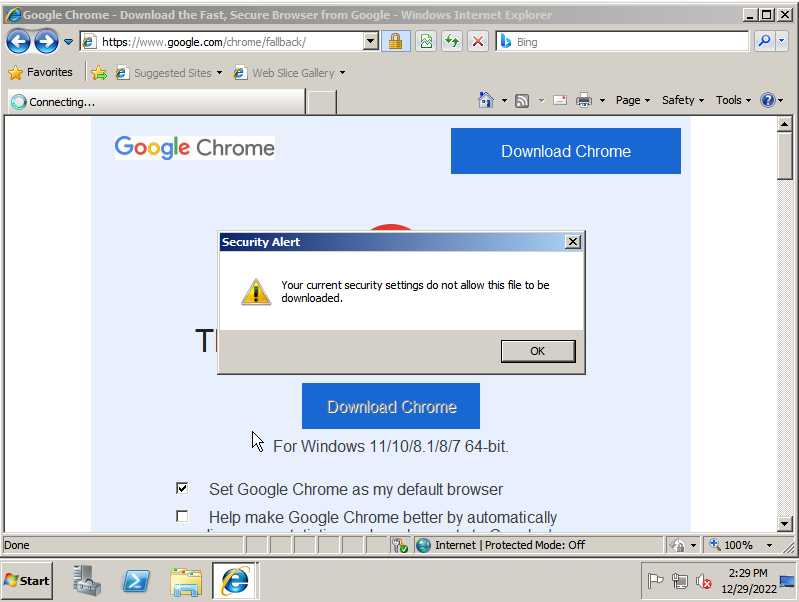
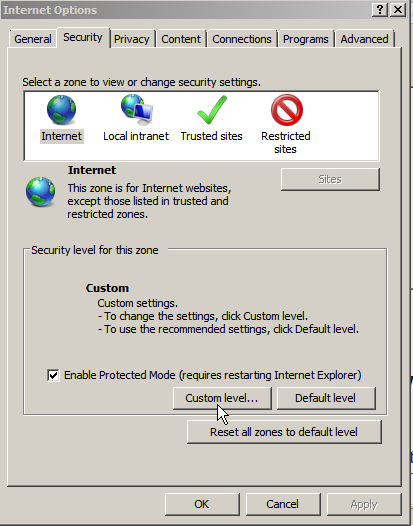
To fix this, I needed to click on Tools > Internet Options, navigate to the Security tab, and click on the “Internet” zone, and then click on “Custom level…”. Once in there, I navigated down to the section labeled “Downloads” and ensured the radio buttons next to “Enable” were selected for both “Automatic prompting for file downloads” and “File download” was checked.
With this change, I was finally able to download and install Chrome, and then once again navigate to Apache Friends and download XAMPP. And, of course, this only brings us to the next problem.
Problem #4 - Installing XAMPP
With the .exe file finally in hand, I was ready to install XAMPP and call myself victorious for getting this set up. I ran the executable, with cautious optimism in my heart, and was immediately presented with a warning. Ugh! I was being told that because of an activated User Account Control on my system some functions of XAMPP are possibly restricted. The warning was simple enough, and once again Microsoft provided a course of action to correct it. I simply needed to cancel the installation and disable UAC using msconfig. A quick Google search led me to a post explaining how to do that, which involved nothing more than the following.
- Open the Run dialog with
win + r - Type “msconfig” and hit Enter
- Click the Tools tab
- Choose the “Change UAC Settings” option and click “Launch”
- Slide the slider all the way to the bottom and click “OK”
- Click “OK” to close out the System Configuration modal
- Restart the computer so that the UAC changes take effect
Now with the UAC settings turned off - this is supposed to be a vulnerable VM anyway, so who cares about user settings? - I was able to run the installer with no issues. During the installation process, I opted to uncheck the options for FileZilla FTP Server, Mercury Mail Server, Tomcat, Perl, phpMyAdmin, Webalizer, and Fake Sendmail. Or, in other words, I only kept Apache, MySQL, and PHP. The rest of the settings I left at their default values. As the installer got to work, I was hopeful that I had finally solved it all and everything would be groovy. Wrong. Dead wrong. I was able to successfully install XAMPP, but when I launched the Control Panel and tried to start the Apache and MySQL services, I was presented with yet another issue.
Problem #5 - Turning on Apache
Installing Visual C++ 2015
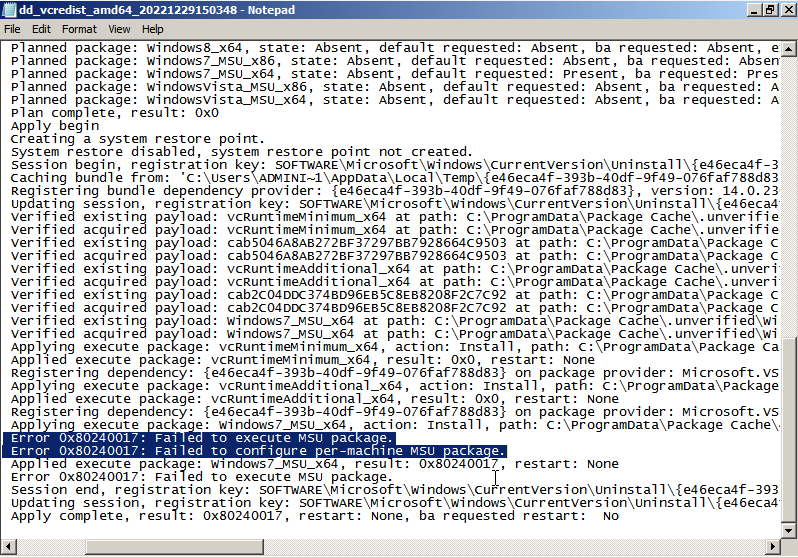
The MySQL service started seamlessly, but starting Apache gave me an error about api-ms-win-crt-runtime-l1-1-0.dll missing, which was causing the httpd.exe program to fail. In my original attempt at getting this to work, when I installed the Standard “version” of Windows Server 2008, instead of the Web Server, I was presented with a similar error message about VCRUNTIME140.dll missing from my machine. Googling either one of these errors will lead you to several posts indicating that these DLLs are available with Microsoft’s Visual C++ 2015 redistributable. The reason the error about the missing VCRUNTIME140.dll didn’t show up this time was because Visual C++ 2017 Redistributable was installed with the rest of the OS as part of the Web Server installation. For whatever reason, though, this other DLL seemed to still be missing. So, off I went to install the 2015 redistributable. I downloaded the .exe file, ran it, and BAM! Immediately hit with an error. Again, Microsoft’s error messages were packed with actionable next steps. This error message informed me that another version of this product was already installed. Easy enough, I’ll just uninstall 2017 so I can install 2015, which is exactly what I did. I go to run the 2015 installer again and BAM! Almost immediately hit with another error message. This time, however, the error message was less than helpful. It simply read “0x80240017 - Unspecified error”.
Cool. Cool, cool, cool. At least the error message provided a link to the log file.
Executing an MSU package
I had absolutely no idea what this error message meant, and this is the one that took me the longest to troubleshoot because all of the advice I was seeing wasn’t working. The first solution I found was in this post, which said that the prerequisite patch KB2999226 needed to be installed, and it gave a link to a download page. So I searched for the file called “VS2015 Universal C Runtime Prereq KB2999226 64-bit”, as indicated in the forum, downloaded it, ran it, and was presented with yet another error telling me that this update was not applicable to my computer.
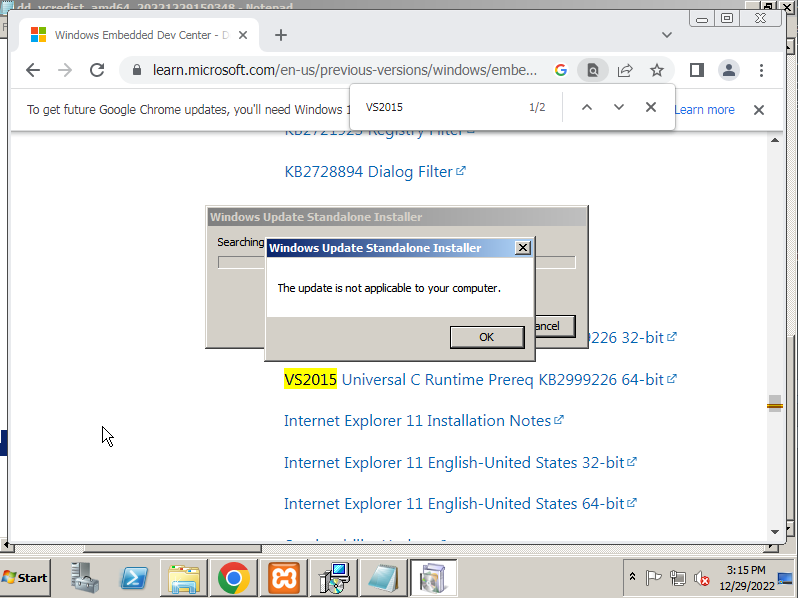
Installing prereq KB2999226
Googling this error eventually led to a few forums indicating that this is because Service Pack 1 needed to be installed. Okay, not a problem, I’ll just head over to the Windows Update service and install the updates. No joy. The updater just sat there spinning for a while before telling me that checking for updates failed and something was potentially blocking SVCHOST from accessing the Internet. At this point, I’ll admit, I became disheartened and went and took a nap. Eventually, I got back to it, and with some luck I was able to stumble across a StackOverflow answer that pointed me to a post that explained how to install the KB2999226 prereq manually. The answer was about halfway down the screen, but it laid out the following commands that needed to be run where $NAME_OF_MSU_FILE is the name of the MSU package that is mentioned in the logs, and $TMP_DIR is the name of a folder that you create and will be used to store the files that are extracted from the .msu file.
wusa.exe $NAME_OF_MSU_FILE.msu /extract:$TMP_DIR
DISM.exe /Online /Add-Package /PackagePath:$TMP_DIR\$NAME_OF_MSU_FILE.cab
For me, the logs pointed to C:\ProgramData\Package Cache\{$UUID}\packages\Patch\x64\Windows6.1-KB2999226-x64.msu, where $UUID was a sequence of hexademical values ([A-F0-9]). So I navigated to that directory, made a copy of the .msu file into my C:\Users\Administrator\Documents directory, and made a new folder called “tmp”. I then ran the commands listed above after running cd C:\Users\Administrator\Documents and was presented with the same error as before telling me that this update was not applicable to my machine. Looks like I was going to need to get Service Pack 1 installed. It took me a lot of Googling, but I was eventually able to find a way to manually download the Service Pack 1 update from Microsoft. When you click the download button for the “Windows Server 2008 R2 Service Pack 1 for x-64 based Systems” file, you’re given two options: a .msu file and a .exe file. I tried both files, doing the .msu file first, but the .exe file seemed to be the one that actually installed the Service Pack.
Getting the dependencies right
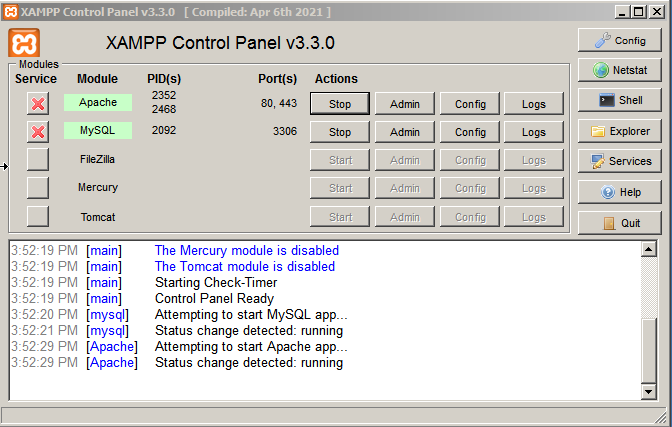
It took a little bit for the Service Pack 1 update to install, but after it finished I was able to start working backwards through my stack of issues. With SP1 installed, I was able to run the commands to manually install the KB2999226 prereq, which in turn allowed me to install Visual C++ 2015. I thought all was going to be well at this point. I mean, afterall, look at everything I’d already fixed just to get this working! Alas, that was not the case. Clicking on the start button for the Apache service generated an entry in the Control Panel log file that said “Attempting to start Apache app…”, but there were no additional messages indicating that that was successful. Instead, I had to click on the “Logs” button for Apache and open the error log to see that it was complaining that the VCRUNTIME140.dll file was incompatible with the version of PHP I was running. More Googling ensued, and ultimately the answer was to install Visual C++ 2015-2022, which I downloaded from here. Installation was quick and successful, and after restarting my VM, I was able to successfully launch Apache.
Conclusion
I now had a virtual machine running Windows Server 2008 R2 with XAMPP installed! It was a frustrating day, but being able to work through all of these issues and come out successfully running what I wanted to run made me inexplicably happy.
I haven’t attempted to install DWVA yet as I’m giving myself some time to process and unwind from this debugging session, but I’ll be sure to update this post should anymore issues arise.